
If you’ve ever wondered how to draw a Skeleton Hand Drawing, then you’re not alone. Whether you’re drawing a skeleton hand for a science project or just a frightened zombie for fun, this guide will help you understand how to draw a hand like the real thing! You’ll learn how to shade skeleton hands and how to create realistic hands.
Draw a realistic skull
If you want to create a realistic drawing, you must pay attention to the proportions of the bones in the skull and its hand. In this case, the width of the cranium should be proportional to the width of the jaw. If you want to draw a realistic skull hand, you should consider adding textures to the drawing. Using a drawing guide to make this process more enjoyable and accurate is highly recommended.
After sketching the basic shapes, you should draw the contour lines that define the contours of the skull. These lines will highlight the subtle nuances of the skull. Follow these guidelines: the eye sockets will intersect the vertical line while the nose will meet the horizontal line. If you want to make your drawing look more realistic, you can also use shading to emphasize the details. Older skulls have indents, cracks, and scratches, which will be accentuated by the contour lines.
You can draw a realistic skull by using reference photographs. Then, you need to connect the lines and add details. Use a reference photo for the teeth. The teeth will appear differently in different photographs. So, it is important to use different reference photos for each part of the skull. You can also add details to the skull by using different techniques and materials. But the most important thing to remember is to practice a lot!
Once you have mastered these techniques, you can try shading the skull. You can start with the darkest parts of the skull to create gradients. Also, keep in mind that the eye sockets and nose are sunken in, which makes them dark. After you’ve completed these parts, you can add other features such as teeth and skin. Make sure to shade these areas with a different color than the rest of the body.
Next, you can move on to the face. After drawing the face, you should draw the eyes. You can start by drawing the eye sockets. Draw a line where the lower part of the skull meets the top half. Then draw lines to indicate where the eyebrows and the nose are located on the skull. You should also include a vertical center line that defines the cheekbones and the jawline. Once you’ve finished these steps, you’ll be on your way to drawing a realistic skull hand.
Draw a realistic arm
There are several essential tips for drawing an arm, and knowing which muscles to use in your illustration can make the whole process much easier. Understanding what goes into a good skeleton hand drawing will help you achieve the correct shape and enliven your illustrations. First, you must understand what makes an arm realistic. The head of the humerus is rounded and offers nearly 360-degree mobility. Drawing an arm is also complicated because the radius bone spins on the ulna, which must always be on the side of the little finger.
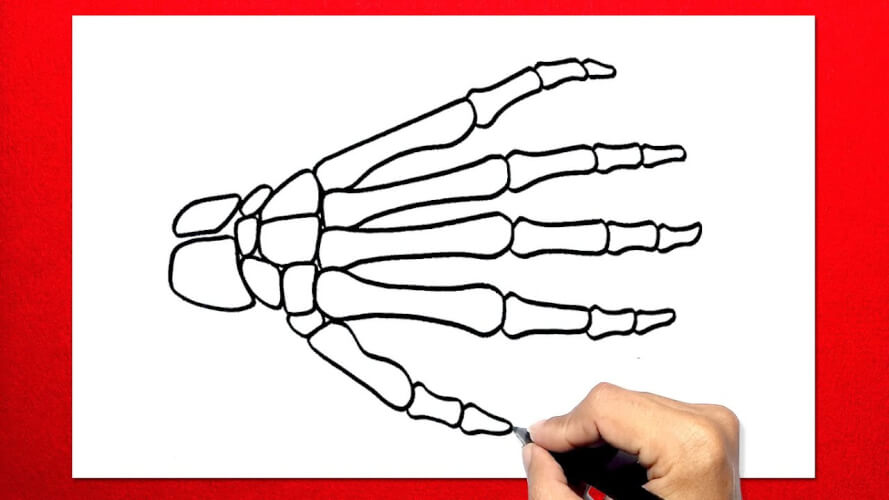
Then, you should find a reference image of a hand. After you’ve selected a reference picture, you should start to develop a light pencil sketch, constantly referring back to the reference. Once you have the basic shape of the hand down, it’s time to begin adding details and shading. Always remember to reference your previous marks so you can make any necessary changes and refine the drawing.
Next, you should begin with the forearm. This part of the arm can be difficult to draw because it has numerous muscles. You’ll need to know the muscles involved in wrist rotation and map their movements to the skeleton bones. The brachioradialis muscle, for example, emerges from the biceps and extends toward the thumb. Then, draw in the wrist rotation and mapping of the muscles.
Another excellent resource for learning how to draw the human body is this book by Andrew Loomis. This book will introduce you to the basic skeleton and simplified volumes. Additionally, you’ll learn how to draw figures, including the hands, feet, arms, legs, and even the facial features of a person. This guide will also give you a good understanding of proportion and perspective.
Draw a realistic tibia
The tibia is a major bony landmark on the lower leg. It’s usually drawn directly across from the fibula, but you should remember that it’s always positioned in the outer region of the lower leg. The tibia is the longer of the two bones, while the fibula is the shorter. In a Skeleton Hand Drawing, the fibula is the shorter of the two.
The tibia is located just below the ankle and extends to the thigh. While the tibia is long and thin, it’s still a major bone and requires careful placement. It should be drawn with light lines, as dark lines make it harder to correct later. Once the bones are in place, you can then draw the hand’s other bones.
Draw a realistic femur
To draw a skeleton hand, you need to understand how light affects shapes. The direction of light is essential for smooth shading. You can use linework to delineate texture. Using a reference image will help you to create a realistic skeleton hand drawing. But remember that you have to be patient while drawing. Make sure you do not erase the sketch too much.
The femur is the largest bone of the human body. It is about two-thirds the length of an individual’s arm. It is connected to the iliotibial tract at different points on the femur. The length of an arm should be the same as the person’s height from the shoulders down. A femur is a large bone, which makes it easy to draw.